Everything you need to build one Linked Lamp. Remember, you'll need to
build two lamps — one for you and one for the other person.
lightbulb
Choose your lighting method below. Both produce nearly identical results —
NeoPixels are slightly brighter. It's simply a matter of convenience and part availability. Any
Linked Lamp can connect to any other Linked Lamp regardless of which method was used.
developer_board Parts List
1×
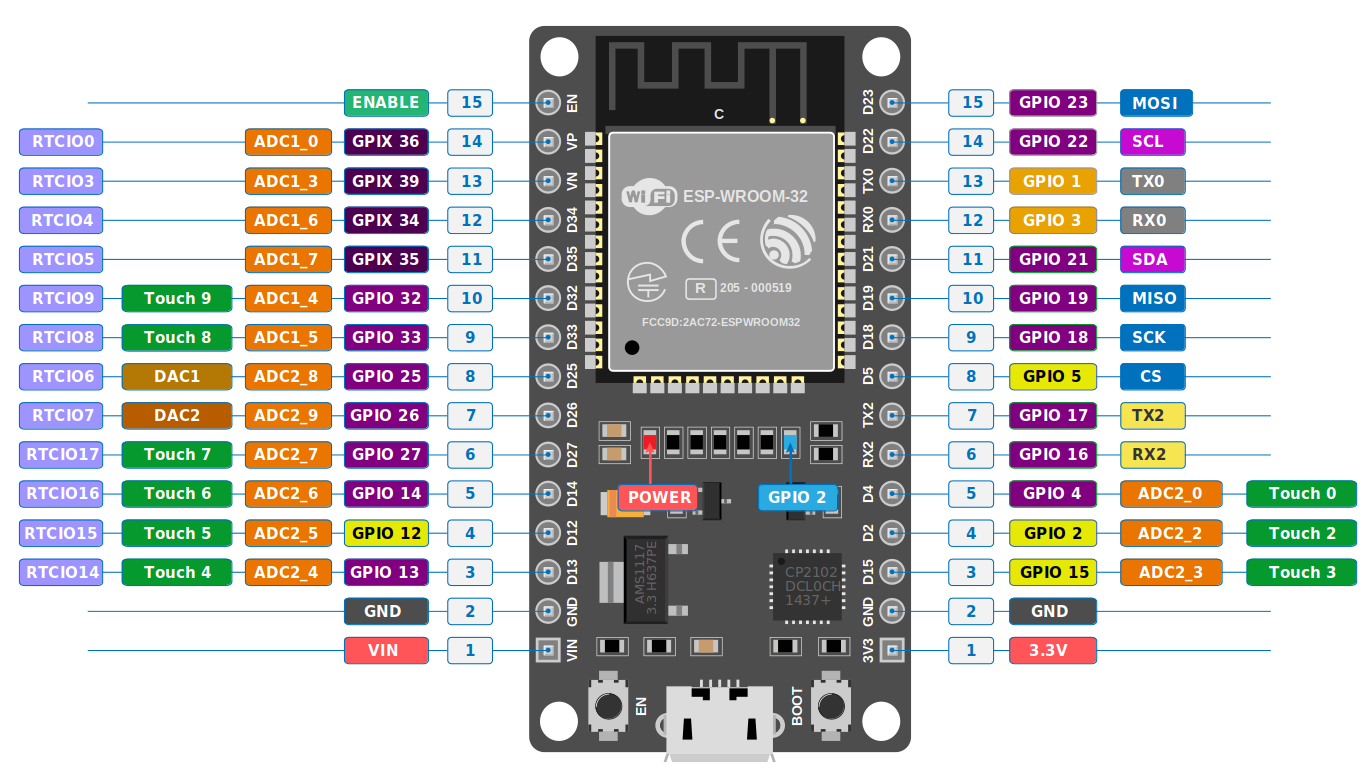
ESP32 ESP-WROOM-32 V1 Dev Board w/ USB-Ci Make sure the pinout matches the required layout.
1×
Custom Linked Lamp PCB (100mm) Order from any PCB manufacturer using the Gerber files below.
6×
Common Anode RGB LEDs Diffused/frosted preferred for
better
light spread.
3×
2N2222 NPN Transistors
3×
330Ω Resistors
2×
15Ω Resistors
1×
22Ω Resistor
1×
TTP223 Capacitive Touch Sensor Module
1×
3-Pin 90° Male Header Pins
4×
M2.5 Screws
1×
USB-C Cable To power the ESP32.
—
Basic Soldering Tools Soldering iron, solder, etc.
1×
NFC Tag Sticker(optional
but recommended) NTAG215 or similar. Placed on the bottom of the base (on the
inside) so you can write
your Web App URL to it — tap your phone on the bottom of the lamp to open the app instantly.
3D Printed Files
Print the Base in a solid
color and the Diffuser in White PLA/PETG for good light diffusion.
ESP32 ESP-WROOM-32 V1 Dev Board w/ USB-Ci Make sure the pinout matches the required layout.
1×
WS2812B NeoPixel Ring Up to 16 LEDs, 66mm outer diameter.
1×
TTP223 Capacitive Touch Sensor Module
1×
3-Pin Male Header Pins
1×
USB-C Cable To power the ESP32.
—
Wires For connecting the NeoPixel ring and TTP223 to the
ESP32.
—
Basic Soldering Tools Soldering iron, solder, etc.
—
Heat Shrink Tubing(optional but recommended) For insulating
solder joints.
1×
NFC Tag Sticker(optional
but recommended) NTAG215 or similar. Placed on the bottom of the base (on the
inside) so you can write
your Web App URL to it — tap your phone on the bottom of the lamp to open the app instantly.
3D Printed Files
Print the Base in a solid
color and the Diffuser in White PLA/PETG for good light diffusion.
Your ESP32 board's pinout must match this diagram. Make sure it has 30 pins (15 per side)
with VIN and GND in the correct positions. The USB connector should be USB-C.